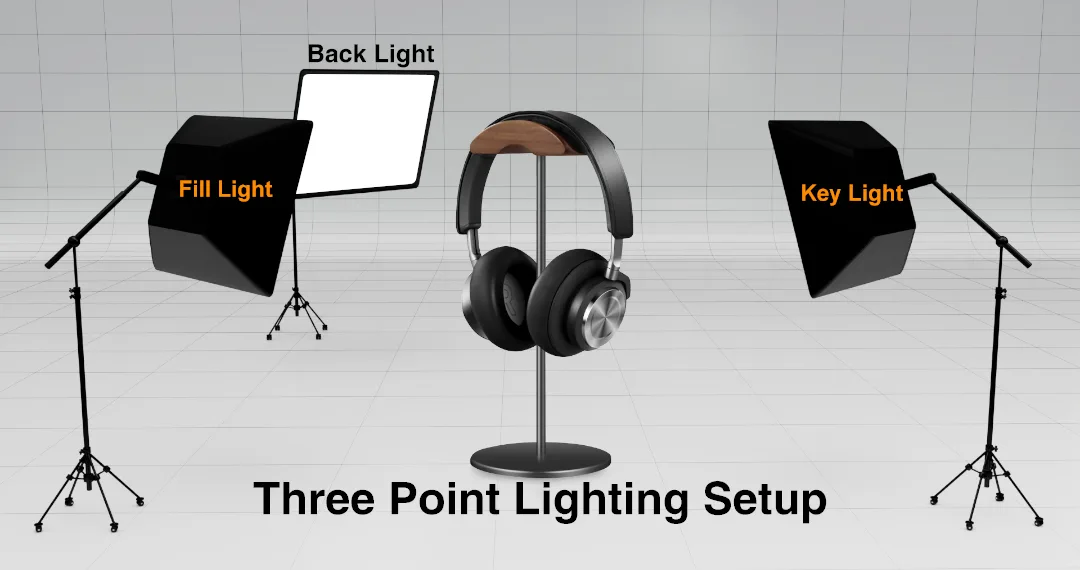
Do you know? Light is the most important factor in CGI & Photography. Today we learn about three-point lighting.
What is Three Point Lighting?
Three-point lighting is a technique used in 3D project, film, Photography, and theater to represent three-dimensional objects. In the film, three-point lighting is used to create shadows that reveal the form of an object. In Photography, three-point lighting is used to produce an even distribution of light. In theater, three-point lighting creates the illusion of depth on a flat, two-dimensional stage. This technique is created by three lights, one key light, one fill light, and one Backlight.

Key Light: Key light is the main light source. The key light is the most important light in the scene. It’s the one that casts the most light on the subject, and it’s the one that the photographer will spend the most time adjusting.
Fill Light: Three-point lighting is a lighting technique that consists of three separate light sources. The key light is the main light, which is usually placed in front of the subject. The fill light is the softer light, which is usually placed on the opposite side of the key light.
Backlight: The Backlight is also known as the “hair light.” This light focuses on the shine of an object behind. This makes an edge of light or layout around their head that drives the subject away from the background and gives a feeling of profundity.
Three-point lighting is a technique used in Photography and cinematography to add depth and dimension to a subject. It is achieved by positioning the key light at a 45-degree angle to the subject, the fill light at a 90-degree angle, and the Backlight at a 180-degree angle to the subject.
How to use Three Point Lighting?
There is no motto for how to use three-point lighting. It depends on your demand, subject matter, and the total mood of a photographer. Now we are giving some tips for how to use three point lighting.
- Great lighting makes a really intriguing and dynamic picture where the subject is seen with an additional aspect and where the cinematographer has more command over shadows.
- The lighting setup carries aspects to characters. Three-point lighting additionally helps shape a subject to draw out the best or most awful of them.
- By putting a delicate key light somewhat askew with a 2:1 fill proportion, a cinematographer makes a delicate, complimenting look that will generally conceal flaws in the skin when your subjects are individuals. This delicate lighting is classified as “high key lighting” and makes a hopeful, cheery, young, light, and vaporous state of mind that is normal in sitcoms and comedies.
Tips & Tricks for Setting up Three-Point Lighting
When you set up the three-point light, that time follows several key components. Now, we going to share some tips and tricks for how to set up three-point lighting:
- Establish your light setup: Before you start setting up your lighting unit, you need to know unequivocally what look you need to accomplish and why. It is never arbitrary to Light arrangements. Beginning in obscurity, or with as minimal unnatural light as could be expected, is the most effective way to measure how much light you’re projecting regarding your matter during the cycle. You can likewise utilize a light meter, a filmmaking and photography apparatus that action major areas of strength for what is on a surface, like a subject’s face.
- First of all, set the key light: The main light will be the key light. Contingent upon where your subject is confronting, you’ll need to put your key light to the right or left of your camera at a 45-degree point. The key light will frequently be the most brilliant and do a large portion of the lighting work regarding your subject.
- Next, add your fill light: In this 3rd step, add your fill light. For the most part, the fill light ought to be less splendid than your key light as it’s intended to fill in the shadows regarding your matter’s face and highlights. Contingent upon where your key light is found, the fill light should be on the opposite side of your subject.
- Finally, positioning your backlight: Place this light inverse from the key light and behind a subject yet out of the casing to make a complimenting “edge” of light around the subject’s blueprint. This permits the subject to stand apart from the foundation, advancing more three-dimensionality when shot. Numerous cinematographers guide the light to the rear of the subject’s neck as a straightforward reference marker in the business.
- Test Your Setup: After setting up the three-point lighting, check the size, distance, intensity, and position are okay for the cinematographers. If it is not perfect for photography, you can change everything until it is perfect.
What is Four Point Lighting?
According to Google, Four-point lighting consists of exactly the same setup as three-point lighting, with an additional fourth light dedicated to illuminating the background. Four-point lighting: The addition of a fourth lamp enables you to highlight the background of the scene.
Four-point lighting is one of many different types of basic light setups used in photography. It consists of 4 different lights: Key Light (1), Fill Light (2), Rim Light (3), and Background Light (4). The key light should always be placed directly behind your subject, shining towards them while hitting them at a 45-degree angle. In general, your key light should always be brighter than both your fill and rim lights since it will create a stronger shadow behind your subject and help brighten up dark areas that might otherwise appear muddy if only using fill.

